
Spring Learning and Analysis
I’ve been taking classes recently, and in my spare time I’ve been doing a little development. Mainly, I want to study Spring more deeply from a developer’s perspective; I feel it is somewhat helpful.
This article starts with traditional Servlet containers and gradually explores the core concepts of the Spring framework, helping you understand the evolution from traditional Java Web development to modern Spring Boot development.
Traditional Servlet Container Approach
That is, running a Web application in a Servlet container such as Tomcat, Jetty, or Resin.
In the traditional model, a Web application does not run directly as a JAR; it must be packaged as a .war (Web Archive) file.
Maven configuration
<packaging>war</packaging>Directory structure
your-app.war
 └── WEB-INF/
      ├── web.xml
      ├── classes/   (编译后的字节码)
      └── lib/       (依赖的jar包)
Deployment process
The basic process is as follows:
打 WAR 包 →

写 web.xml 注册 Servlet/Filter →

放到容器的 webapps →

启动容器访问应用。
Tomcat mapping logic
Tomcat’s mapping logic is as follows; ROOT corresponds to /:
| Location | Context Path | Example access |
|---|---|---|
webapps/ROOT/ | / (default) | http://localhost:8080/ |
webapps/test/ | /test | http://localhost:8080/test/ |
webapps/blog/ | /blog | http://localhost:8080/blog/ |
Detailed web.xml configuration
Here is a comprehensive example of the web.xml specification:
<?xml version="1.0" encoding="UTF-8"?>
<web-app xmlns="http://java.sun.com/xml/ns/javaee"
         xmlns:xsi="http://www.w3.org/2001/XMLSchema-instance"
         xsi:schemaLocation="http://java.sun.com/xml/ns/javaee http://java.sun.com/xml/ns/javaee/web-app_3_0.xsd"
         version="3.0">

    <!-- 应用显示名 -->
    <display-name>My Traditional Java WebApp</display-name>

    <!-- 全局上下文参数(在 ServletContext 中可读) -->
    <context-param>
        <param-name>app.mode</param-name>
        <param-value>prod</param-value>
    </context-param>

    <!-- 监听器:常用于初始化资源/集成框架 -->
    <listener>
        <listener-class>com.example.listener.AppContextListener</listener-class>
    </listener>

    <!-- 编码过滤器(中间件) -->
    <filter>
        <filter-name>EncodingFilter</filter-name>
        <filter-class>com.example.filter.EncodingFilter</filter-class>
        <init-param>
            <param-name>encoding</param-name>
            <param-value>UTF-8</param-value>
        </init-param>
    </filter>
    <filter-mapping>
        <filter-name>EncodingFilter</filter-name>
        <url-pattern>/*</url-pattern>
        <dispatcher>REQUEST</dispatcher>
    </filter-mapping>

    <!-- 业务 Servlet -->
    <servlet>
        <servlet-name>HelloServlet</servlet-name>
        <servlet-class>com.example.servlet.HelloServlet</servlet-class>
        <load-on-startup>1</load-on-startup>
        <init-param>
            <param-name>greeting</param-name>
            <param-value>Hello</param-value>
        </init-param>
        <async-supported>true</async-supported>
    </servlet>
    <servlet-mapping>
        <servlet-name>HelloServlet</servlet-name>
        <url-pattern>/hello</url-pattern>
    </servlet-mapping>

    <!-- 会话 & 安全配置 -->
    <session-config>
        <session-timeout>30</session-timeout>
        <cookie-config>
            <http-only>true</http-only>
            <secure>true</secure>
        </cookie-config>
        <tracking-mode>COOKIE</tracking-mode>
    </session-config>

    <!-- 错误页映射 -->
    <error-page>
        <error-code>404</error-code>
        <location>/error/404.jsp</location>
    </error-page>
    <error-page>
        <exception-type>java.lang.Throwable</exception-type>
        <location>/error/500.jsp</location>
    </error-page>

    <!-- 欢迎页列表 -->
    <welcome-file-list>
        <welcome-file>index.jsp</welcome-file>
        <welcome-file>index.html</welcome-file>
    </welcome-file-list>
</web-app>
The age of annotations
Starting with Servlet 3.0, annotations can be used for automatic registration, so web.xml no longer needs to be written.
@WebServlet replaces <servlet> and <servlet-mapping>. A simple example:
import jakarta.servlet.annotation.WebServlet;
import jakarta.servlet.http.*;

@WebServlet("/hello")
public class HelloServlet extends HttpServlet {
    @Override
    protected void doGet(HttpServletRequest req, HttpServletResponse resp) {
        resp.getWriter().println("Hello World!");
    }
}
Similarly:
@WebFilterreplaces<filter>and<filter-mapping>.@WebListenerreplaces<listener>.
Filter mechanism
In other words, middleware for Java Web.
A filter (javax.servlet.Filter) is logic executed before a request reaches a Servlet/JSP and before a response is returned to the client. It is a typical Chain of Responsibility pattern: multiple filters can be invoked in sequence.
The full flow:
客户端发起请求 →
容器(Tomcat)检查 URL 映射到哪些 Filter →
依次执行这些 Filter 的 doFilter() →
执行目标 Servlet/JSP →
响应返回时,再倒序经过这些 Filter →
返回给客户端。
Common use cases:
- Unified encoding handling
<filter>
    <filter-name>EncodingFilter</filter-name>
    <filter-class>com.example.filter.EncodingFilter</filter-class>
    <init-param>
        <param-name>encoding</param-name>
        <param-value>UTF-8</param-value>
    </init-param>
</filter>
<filter-mapping>
    <filter-name>EncodingFilter</filter-name>
    <url-pattern>/*</url-pattern>
</filter-mapping>- Login authentication
<filter>
    <filter-name>AuthFilter</filter-name>
    <filter-class>com.example.filter.AuthFilter</filter-class>
</filter>
<filter-mapping>
    <filter-name>AuthFilter</filter-name>
    <url-pattern>/secure/*</url-pattern>
</filter-mapping>
Evolution of the Spring framework
Spring does not completely replace Servlets; it evolved into a higher-level framework on top of Servlets.
Project directory conventions
Java code is stored under the src directory, following the standard Maven/Gradle project structure:
controller/: REST endpoints or MVC controllersservice/: business logic (interfaces + implementation classes)repository/: data access (usually JPA or MyBatis)model/ 或 entity/: database entity classesconfig/: Spring configuration classes, such asWebMvcConfigurerandSecurityConfig
Spring MVC workflow
The core of Spring MVC is DispatcherServlet, which acts as the front controller and handles all requests:
请求 → DispatcherServlet → Controller → Service → Mapper → DB → 返回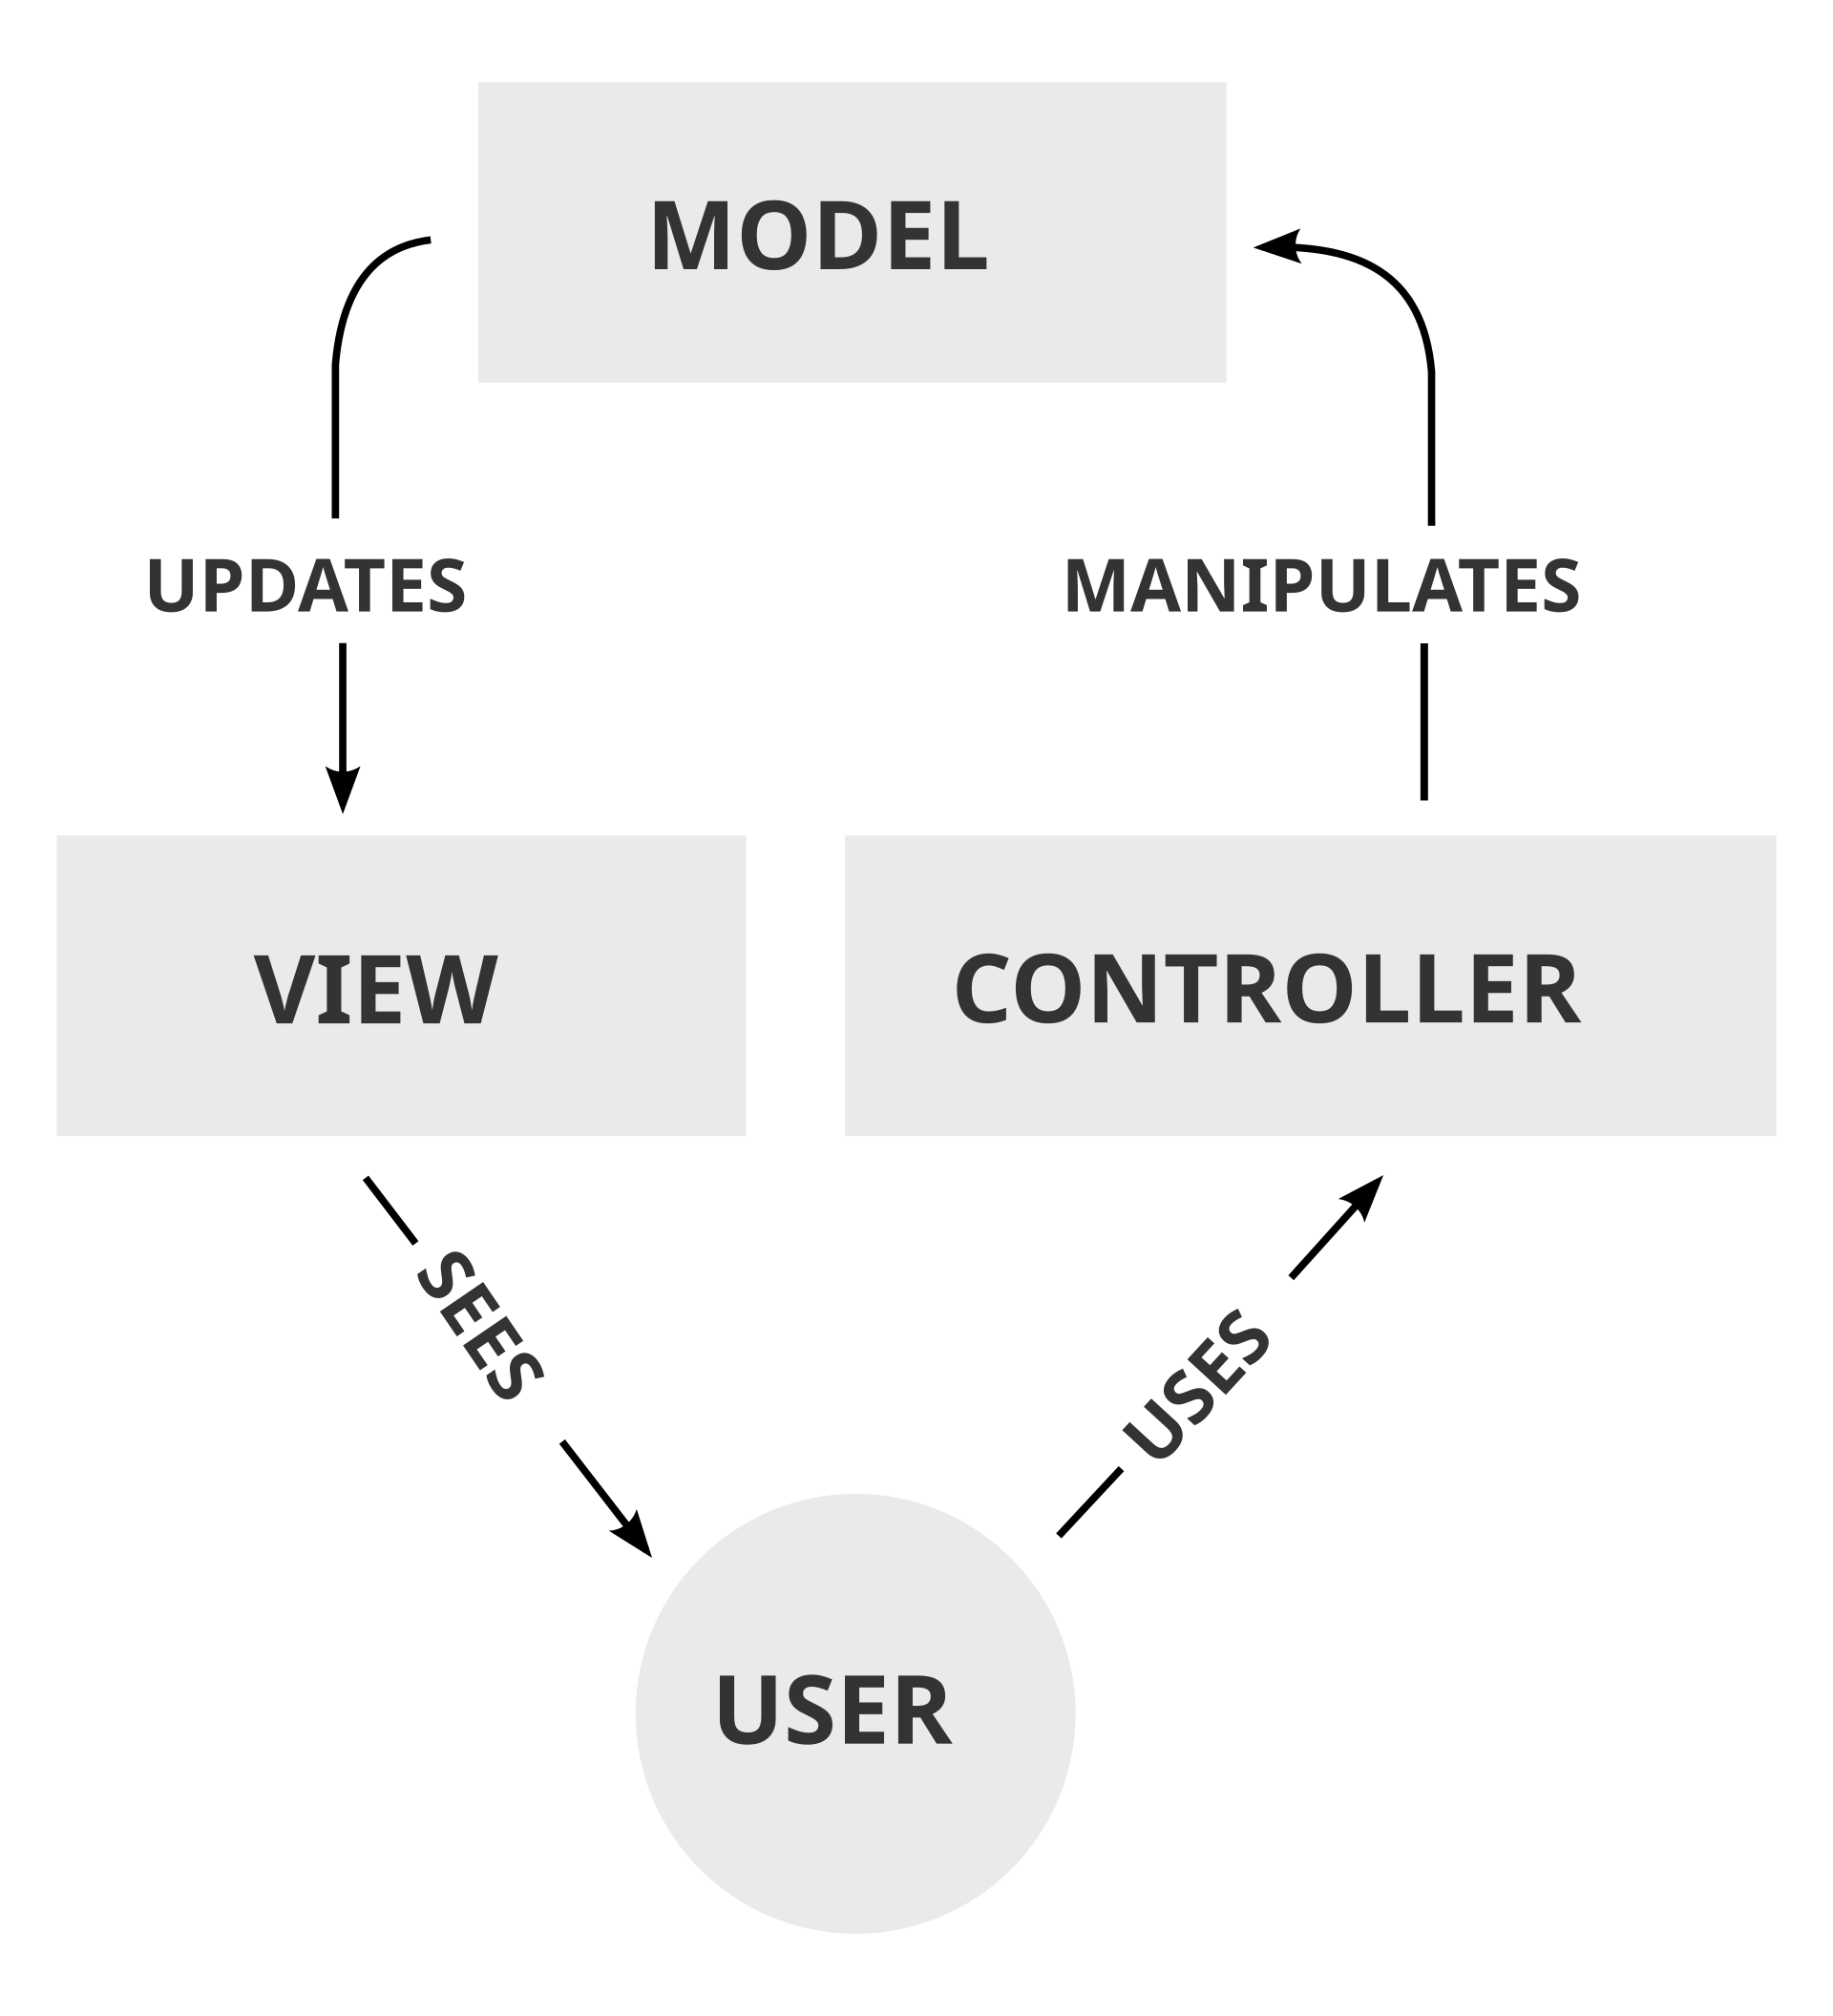
Common annotations explained
- @Controller - Marks a class as a controller that returns page views.
- @RestController - =
@Controller + @ResponseBody; returns JSON directly. - @RequestMapping - Defines request paths and methods; can be used together at class and method level.
- @GetMapping / @PostMapping / @PutMapping / @DeleteMapping - More specific HTTP-method mappings.
- @RequestParam - Gets URL parameters.
- @PathVariable - Gets path parameters.
- @RequestBody - Gets the request-body JSON and converts it to a Java object.
Practical example
LoginController.java
package com.bx33661.springlearn.controller;

import com.bx33661.springlearn.entity.User;
import org.springframework.web.bind.annotation.PostMapping;
import org.springframework.web.bind.annotation.RestController;

@RestController
public class LoginController {
    @PostMapping("/login")
    public String login(User user) {
        System.out.println("name: " + user.getName());
        System.out.println("password: " + user.getPassword());
        return "success";
    }
}
User.java
package com.bx33661.springlearn.entity;

public class User {
    private String name;
    private String password;

    public String getName() {
        return name;
    }

    public void setName(String name) {
        this.name = name;
    }

    public String getPassword() {
        return password;
    }

    public void setPassword(String password) {
        this.password = password;
    }
}
The key point here is that the @PostMapping("/login") method’s login(User user) can directly receive a User object as an argument. This is because parameter binding and message conversion in Spring Framework automatically convert HTTP request data into a Java object behind the scenes.
POJO and JavaBean conventions
POJO - Plain Old Java Object
A POJO is a lightweight Java object that follows these conventions:
- POJO properties (fields) are usually private and accessed through getter and setter methods to ensure encapsulation.
- Provide public getter and setter methods for each private field, following naming conventions:
- Getter: getXxx() (for boolean types, isXxx() can also be used)
- Setter: setXxx(T value)
The main example is the User class above.
JavaBean conventions
A JavaBean is a special kind of POJO whose class conforms to JavaBean conventions.
Requirements:
- Must have a no-argument constructor (to facilitate reflective object creation).
- Properties must be private.
- Provide corresponding getter/setter methods to access the properties.
- May implement the
Serializableinterface (for convenient serialization and transfer).
Example:
import java.io.Serializable;

public class Student implements Serializable {
    // 为了避免不同编译器生成不同的序列化ID
    private static final long serialVersionUID = 1L;

    private String id;
    private String name;

    // 必须有无参构造函数
    public Student() {}

    // 有参构造也可以,方便初始化
    public Student(String id, String name) {
        this.id = id;
        this.name = name;
    }

    // Getter / Setter
    public String getId() {
        return id;
    }

    public void setId(String id) {
        this.id = id;
    }

    public String getName() {
        return name;
    }

    public void setName(String name) {
        this.name = name;
    }

    // 重写toString,方便打印对象
    @Override
    public String toString() {
        return "Student{id='" + id + "', name='" + name + "'}";
    }
}
Learning about the Resource directory
It mainly stores resources, but the exact conventions depend on the type of resource:
static/→ static resources (HTML, JS, CSS, images), accessed via the/path.templates/→ template-engine files (such as Thymeleaf).META-INF/resources/→ the highest-priority static-resource directory.
This directory is copied as-is into the compiled output directory:
target/classes/The result is:
src/main/resources/application.properties
→ target/classes/application.properties
So we can write it like this:
InputStream in = getClass().getResourceAsStream("/application.properties");Spring error-handling mechanism
Spring Boot has an internal
BasicErrorControllerthat intercepts errors and returns default JSON or HTML.
Typical error page
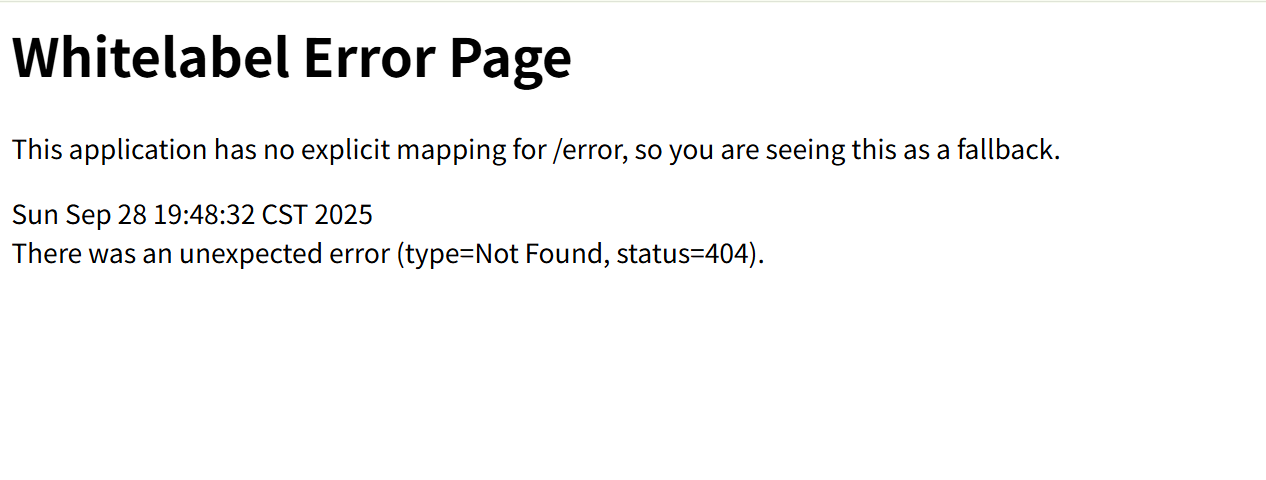
JSON-formatted error information
{
  "timestamp": "2025-09-29T13:22:33.134+00:00",
  "status": 404,
  "error": "Not Found",
  "message": "No message available",
  "path": "/test"
}
Interpreting the error:
- type=Not Found, status=404: the server could not find the requested resource.
- This application has no explicit mapping for /error: the application has not defined a custom error page for the /error path.
- The timestamp records when the error occurred.
Custom error pages
⚠️ Note: Spring Boot automatically looks for a corresponding page under
templates/error/orstatic/error/based on the HTTP status code.
Directory structure:
src/main/resources/
    └── templates/error/      # 或者 static/error/
        ├── 404.html
        ├── 500.html
        └── error.html
If using a template engine such as Thymeleaf, pay attention to the dependencies and corresponding controller configuration.
You can also customize an error controller to override the native error handling:
@Controller
public class MyErrorController implements ErrorController {

    @RequestMapping("/error")
    @ResponseBody
    public Map<String, Object> handleError(HttpServletRequest request) {
        Object status = request.getAttribute(RequestDispatcher.ERROR_STATUS_CODE);
        Map<String, Object> map = new HashMap<>();
        map.put("code", status);
        map.put("msg", "出错啦,请联系管理员~");
        return map;
    }

    public String getErrorPath() {
        return "/error";
    }
}
Revolutionary improvements in Spring Boot
“Convention over configuration” is also known as the Convention over Configuration principle, or CoC.
Simply put, you do not need to explicitly write lots of repetitive configuration. As long as you follow the framework’s default rules, the framework completes the work automatically; only write extra configuration when customization is needed.
Compared with traditional development: The traditional approach requires many XML and other configuration files, and most of the time is spent debugging and writing configuration. Spring Boot aims to solve this problem.
Examples of convention over configuration:
- Directory structure: by default, scanning starts from the package containing the startup class and continues downward to
@Component,@Service, and@Controller; there is no need to declare them manually in XML. - application.properties: provide only minimal configuration, such as the database connection; Spring Boot configures the rest (such as the connection pool and transaction manager) by convention.
- Static resources: place CSS/JS/images under
src/main/resources/static/and access them directly through/xxx.css, with no extra path configuration. - Template pages: put them under
src/main/resources/templates/and Thymeleaf/Freemarker will resolve them automatically.
Spring Boot startup example
package org.example.start;

import org.springframework.boot.SpringApplication;
import org.springframework.boot.autoconfigure.SpringBootApplication;

@SpringBootApplication
public class StartApplication {

    public static void main(String[] args) {
        SpringApplication.run(StartApplication.class, args);
    }
}
Analyzing startup logs
  .   ____          _            __ _ _
 /\\ / ___'_ __ _ _(_)_ __  __ _ \ \ \ \
( ( )\___ | '_ | '_| | '_ \/ _` | \ \ \ \
 \\/  ___)| |_)| | | | | || (_| |  ) ) ) )
  '  |____| .__|_| |_|_| |_\__, | / / / /
 =========|_|==============|___/=/_/_/_/

 :: Spring Boot ::                (v3.5.6)

2025-09-28T20:48:34.589+08:00  INFO 36440 --- [start] [           main] org.example.start.StartApplication       : Starting StartApplication using Java 17.0.16 with PID 36440
2025-09-28T20:48:34.591+08:00  INFO 36440 --- [start] [           main] org.example.start.StartApplication       : No active profile set, falling back to 1 default profile: "default"
2025-09-28T20:48:35.143+08:00  INFO 36440 --- [start] [           main] o.s.b.w.embedded.tomcat.TomcatWebServer  : Tomcat initialized with port 8080 (http)
2025-09-28T20:48:35.429+08:00  INFO 36440 --- [start] [           main] org.example.start.StartApplication       : Started StartApplication in 1.174 seconds (process running for 1.676)
The startup log shows that we wrote only one main(); the framework handles everything else (starting Tomcat, registering Servlets, and scanning Beans) according to its “conventions.”
Starter mechanism
When using IDEA to quickly build a Spring project, we find many all-in-one starters.
Spring Boot and its community provide various spring-boot-starter-*:
| Starter | Integrated functionality |
|---|---|
spring-boot-starter-web | Embedded Tomcat + Spring MVC for rapidly developing RESTful APIs |
spring-boot-starter-data-jpa | JPA + Hibernate for convenient database access |
spring-boot-starter-data-redis | Redis integration (Lettuce client) |
spring-boot-starter-security | Spring Security framework |
spring-boot-starter-thymeleaf | Thymeleaf template engine |
spring-boot-starter-amqp | RabbitMQ message queue |
spring-boot-starter-test | Testing tools such as JUnit5 + Spring Test + MockMvc |
With these, we only need to add a starter to pom.xml or build.gradle, and Spring Boot will automatically integrate the dependencies and configuration.
The essence of Spring Boot lies in:
- The @EnableAutoConfiguration annotation (included implicitly in
@SpringBootApplication). - Automatically loading the corresponding configuration based on whether the relevant dependencies are present on the classpath.
For example:
- If you include
spring-boot-starter-data-redis, Spring Boot automatically createsRedisTemplateandLettuceConnectionFactory. - If you include
spring-boot-starter-web, Spring Boot automatically configures DispatcherServlet, Jackson, and Tomcat.
In the application.yml configuration file, you only need to override the key parameters:
spring:
  datasource:
    url: jdbc:mysql://localhost:3306/test
    username: root
    password: 123456
Developer experience improvements
Hot deployment
Hot Deployment means applying updated code, configuration files, or other resources directly to a running system without stopping or restarting the application, so the changes take effect.
I will not go into specific solutions here, only the hot deployment used in routine testing.
You need spring-boot-devtools:
<dependency>
    <groupId>org.springframework.boot</groupId>
    <artifactId>spring-boot-devtools</artifactId>
    <optional>true</optional> <!-- 防止被下游依赖到生产包 -->
</dependency>
Configure it in the build tag:
<build>
  <plugins>
    <plugin>
      <groupId>org.springframework.boot</groupId>
      <artifactId>spring-boot-maven-plugin</artifactId>
      <configuration>
        <addResources>true</addResources>
      </configuration>
    </plugin>
  </plugins>
</build>
If using IDEA, enable “Build project automatically”:
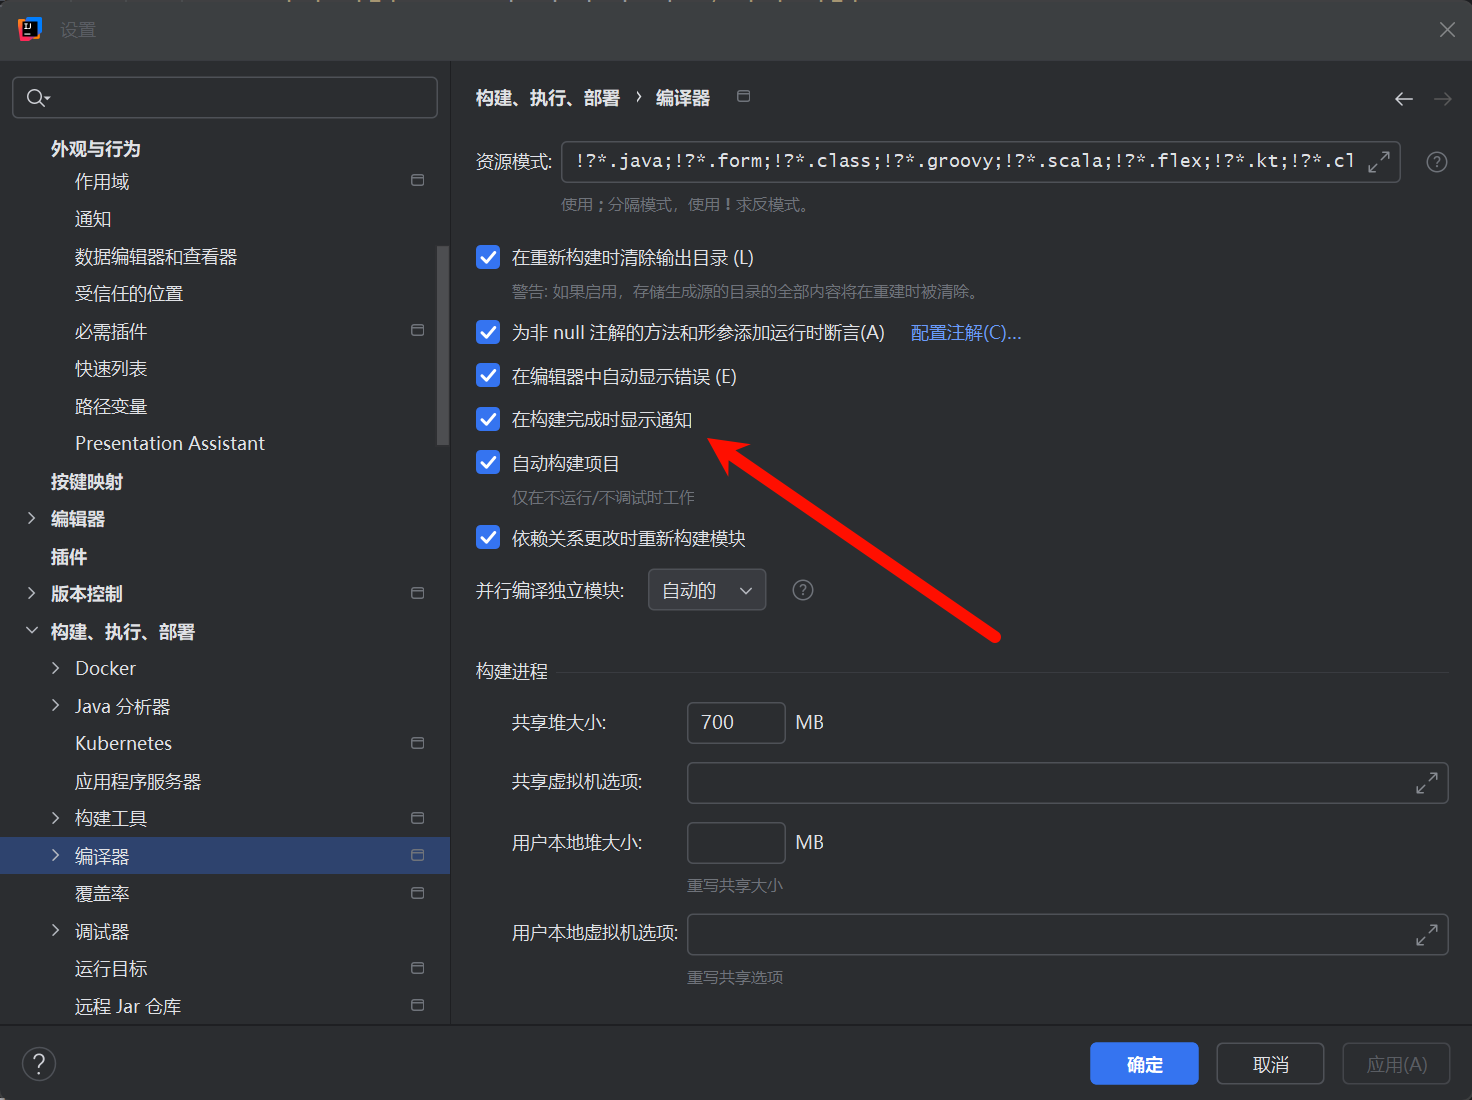
The effect is similar to Python web frameworks: changes take effect immediately. However, this approach is suitable for testing or small projects.
Template engine - Thymeleaf
Thymeleaf is a modern server-side Java template engine that can process HTML, XML, JavaScript, CSS, and even plain text.
Other important concepts
Properties file conventions
This mainly records the file-format conventions.
.properties is one of the simplest configuration-file formats, with the following characteristics:
Basic syntax:
key=valueor
key: value(both work in Spring Boot; = is recommended).
Comments: Begin with # or !.
# 这是一个注释
! 这也是注释
Whitespace handling: Spaces between keys and values are ignored.
server.port=8080Line continuation:
my.long.property=this is a \
  very long line
Result: this is a very long line
Escape characters: Supports \n (newline), \t (tab), \uXXXX (Unicode), and others.
greeting=Hello\nWorld
chinese=\u4F60\u597D
Placeholder references (Spring Boot extension)
app.name=MyApp
app.description=${app.name} is a Spring Boot project
Summary
Through this article, we have learned about the evolution from traditional Servlet containers to Spring Boot:
- Traditional approach: requires complex XML configuration and manual management of components such as Servlets and Filters.
- Spring framework: provides features such as IoC and AOP to simplify enterprise development.
- Spring Boot: further simplifies configuration and deployment through the “convention over configuration” philosophy.
Spring Boot’s design philosophy is to help developers quickly build production-grade applications while retaining Spring’s powerful features and flexibility. Understanding these core concepts is essential for modern Java Web development.